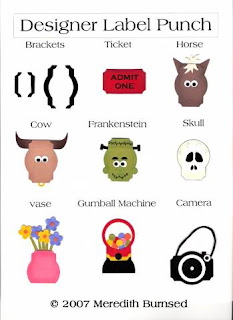
 Look at these cute ideas Meredith has come up with for the Round Tab punch! Can you believe how many things you can create with all of the Stampin' Up punches? I just love the apples, they are perfect for a back to school card or a Thank You card for a teacher.
 Wednesday, August 26, 2009
More ideas...
 Look at these cute ideas Meredith has come up with for the Round Tab punch! Can you believe how many things you can create with all of the Stampin' Up punches? I just love the apples, they are perfect for a back to school card or a Thank You card for a teacher.
 Sunday, August 23, 2009
Saturday, August 22, 2009
More Punches!
Friday, August 21, 2009
I finally made it

Hello again! I made it here to the land of 10 million acres of corn (aka Minnesota). Since I'm still unpacking my stuff I don't have anything new to show you that I have made, but I do have some punch sheets that I will be sharing with you over the next few days that another demonstrator, Meredith Burnsed, has created. Meredith is so creative and you will be amazed at what she has created with her Stampin' Up! punches. Please feel free to e-mail me if you have any questions about how something is made.
Tuesday, August 18, 2009
Favors

It's been awhile since the shower, but I just realized I haven't posted the favors I made so I thought I would post them.
I found a template for them on another blog, but I can't find the link right now. If you recognize where these came from let me know and I will post the link.
Recipe:
Stamps: N/A
Ink: N/A
Paper: Bashful Blue
Accessories: Soft Subtles eyelets, crop-o-dile, 1/4" Chocolate Chip grosgrain ribbon, small cellophane bags.
Monday, August 17, 2009
Thank you gifts

 My summer has come to an end :(. I had quite a few Stamp Camps, Technique classes, and Scrapbooking classes these last few months and I had two very loyal customers (one of them was my mom) who attended every single class. I thought I would make one of the suitcases from Becky's Traveling Trio set for each of my customers and include some matching cards to go with the suitcase. I am so pleased with how they turned out!
 If you have any questions on how I made anything or what I used please don't hesitate to contact me.
Sunday, August 16, 2009
Monkey Tower

Joana and I made some "It's a Boy" favors to give out after Nathan is born. We put a few Hershey's Kisses that are covered in blue foil and say it's a boy inside the small Stampin' Up! cellophane bags and tied some bashful blue 1/4" grosgrain ribbon, then we put the bags inside of the boxes we made using the Big Shot (boy do I love that thing!!).
Recipe:
Stamps: Monkey Business, I can't remember the name of the roller right now
Ink: Bashful Blue, Chocolate Chip
Paper: Whisper White
Accessories: Small cellophane bags, 1/4" Bashful Blue grosgrain ribbon, Big Shot
Tuesday, August 11, 2009
Gift box


Last Saturday I went to baby shower #2 for Nathan. Another friend of Joana's hosted this shower over in Seattle.
I had this little monkey and pair of socks I bought for Nathan awhile back so I made a box and set them inside. The instructions for the box can be found on Becky's website. She has some amazing step-by-step tutorials that you can buy at a very reasonable price.
Recipe:
Stamps: Monkey Bussiness, Everything Baby
Ink: Chocolate Chip, Bashful Blue
Paper: Chocolate Chip, Bashful Blue, Whisper White
Accessories: Key Tag punch, Small and Large Tag punches, double stitched chocolate chip grosgrain ribbon, Hemp
Thursday, August 6, 2009
Techniques Class


Throughout the summer I have been doing a techniques class. This last Tuesday was the last class of the summer. Here are the two cards my customers created after learning their new techniques.
The first technique was watercoloring roses from the Fifth Avenue Floral stamp set. Patty does a great tutorial if you are interested.
The next technique was the mosaic technique. I learned this from a fellow demonstrator. It's a great way to use up DSP scraps that you just can't seem to throw away.
Mosaic directions
1. Cut up 1/2" strips of Designer Series Paper (DSP) into small pieces. The pieces do not need to be the same shape or size.
2. Arrange your pieces onto a sticky sheet of paper (I used a mailing label).
3. Once you have arranged your randomly cut scraps onto the sticky paper sprinkle embossing powder over your sheet. Shake off the extra powder and emboss with your heat tool.
4. Add to the front of your card and embellish as desired.
Tuesday, August 4, 2009
Baby Buggie

Stamps: Riveting
Ink: Bashful Blue
Paper: Bashful Blue, Whisper White, Bashful Blue DSP
Accessories: Eyelet border punch, Scallop punch, 1 3/8" punch, 1 1/4" punch, Whisper White taffeta ribbon, Big Shot scallop circle die
By looking at the card that Liz made I just kind of made up my own version. If you are interested in how to make the card let me know and I'll try my best to walk you through the directions.
Monday, August 3, 2009
Baby Shower pictures
 Here are a few pictures from the baby shower on August 1st. Everyone had a great time and Joana and Steve recieved some wonderful gifts for baby Nathan.
Subscribe to:
Comments (Atom)


